Monday, September 29, 2008

And Then There Was Fudge

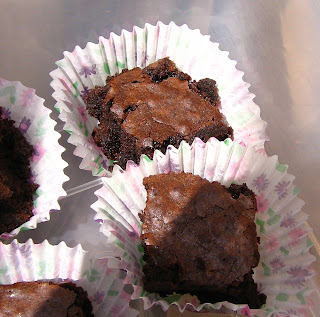
Did anyone mention fudge brownies? Wait a minute, it was me! I made them the night before the egg tarts. Yea, I was on a rampage :) The brownies turned out really well, I couldn't be happier. It has a slight crust with a fudgy center, pure sinful bliss! 

Here's the recipe by Matt Jones, (from BBC Olive Magazine June 2006);
400g dark chocolate
325g butter, unsalted
6 whole eggs + 2 yolks
300g sugar
50g cocoa powder (I used Hershey's)
80g all purpose flour

1. Before you do anything else, heat the oven to 180C. 
2. Grease a 8x8 baking tin with butter.
3. Melt dark chocolate and butter in bowl over hot water. Leave to cool for a bit.
4. Whisk (by hand) eggs and sugar till pale, then fold in the melted chocolate.
5. Sieve cocoa powder & all purpose flour or just stir vigorously with a balloon whisk.
6. Fold into the chocolate mixture until evenly mixed.
7. Pour into the baking tin and bake for 20-30 minutes or till a toothpick inserted in the centre comes out almost clean.
8. Warm brownies are easier cut with a plastic knife. Be brave and indulge. Fuss over the calories later!


i think i got about 20 delectable bites

upon closer inspection

Sunday, September 28, 2008

Egg Tarts (Version 1.0)

Hello! It's been a while since my last entry. Work in the past week has been crazy. I've done the morning shift, the afternoon shift and also the SPLIT shift. Yes, this is where I spend the 1st 4 hours of the morning shift (0630-1030), go home (to supposedly get some rest) and then get back in the office again for the final 4 hours of the afternoon shift (1600-2000). It's awful yes, but I am thankful it's just for a fortnight.

Anyways, I went back to my hometown on Friday night and recuperated by making some fudge brownies and egg tarts. The brownies were fudge-tastic but the egg tarts, unfortunately were not so. But it's alright, this is where I learn and improve the next time. 

You can get the recipe from these 2 fabulous sources, Nicole of bakingbites or Kuali. Mine was from Nicole's. I need to assure you that the recipe is perfectly fine but I think my method of execution wasn't. 
 
Ok, let's do a post mortem on my tarts. Haha...sounds wrong. 

Blunder no.1: Something's not right with the butter. Now I'm not putting the blame on the cow but the butter did taste rather different. Sure it wasn't expired but it wasn't fresh either. I suppose it's been sitting in the sundry shop's cooler display cabinet for some time before dad picked it up. Oh and I am pretty sure the butter's been keeping some sausages and vegetables company for a while too. Lesson learnt. Get good quality butter from a store that separates their dairies, meats and greens in proper sections.

Blunder no.2: Tart crust was too thick. I admit I wasn't patient enough when moulding the dough into the muffin pan. (Hey gimme a break, I woke up at 7am to make these babies and it was my first attempt at pastry dough). Lesson learnt. Have enough sleep OR use a rolling pin to flatten the dough and cut out using an upside down cup before fitting it in the muffin pan.

crusty craters....cringe!
 
Blunder no.3: Foam ain't pretty. You'd want a golden, glossy finish. Lesson learnt. Skim off the white frothy stuff from the egg yolk mixture. 

mass bubbles of un-prettiness

However all is not lost. Lady luck was kind to me, there was ONE tart that turned out quite alright. And here it is, tadaa!

better results next time......watch out for version 1.1!

Monday, September 15, 2008

Cheater's 'Claypot' Chicken Rice

Here's a wholesome 1 pot meal that you could make in a jiffy. Somewhat similar to yam rice but with more ingredients in it. It's especially good for days when you're just too lazy to cook but still want to have rice for dinner. 

It will be ideal if you could use a claypot for this dish but if not, a rice cooker works too. Hence, the title.

This recipe is just nice for 3 girls. Probably not enough for 2 guys though :)

2 cups of rice

6-8 slices of ginger
2 bulbs shallots, sliced
1 chicken wing/thigh and some breast meat, cut into bite size pieces 
2 pcs chinese sausages, sliced
half a cup of button mushrooms, cut into quarters
1/2 tsp dark soya sauce
1/2 tbsp sesame oil
1/2 tsp of white pepper
1 tbsp oyster sauce
1 tbsp cooking oil
a pinch of salt
water for 2 cups of rice (fill water according to the markings in the rice pot)

For garnishing
2 small pcs salted fish, fried till crisp, chopped finely
spring onions, chopped

Method
1. Marinade chicken with white pepper, oyster sauce and sesame oil. Leave in the fridge for a couple of hours.
2. Wash and drain rice. Set aside.
3. Heat oil in a wok, fry shallots followed by ginger till fragrant.
4. Add chinese sausages and fry till the lard from the sausages starts to melt.
5. Add chicken and mushrooms. Stir fry for another few minutes.
6. Add rice, dark soya sauce and salt. Mix well.
7. Transfer rice into a rice pot and top up with water.
8. Switch on the rice cooker, wait for the magical 'click' sound and you’re done!
9. Dish out into bowls and garnish with chopped salted fish and spring onions.


my favourite! the crispy crust found at the bottom of the rice pot

Thursday, September 11, 2008

Homemade Goodness - Soya Bean Milk

Some people believe that expecting mothers should take soya bean milk regularly during the phase of their pregnancy so that their baby would have fair skin. I'm rather skeptical about it. But what I can vouch for is how delightful, a cup of cold fresh soya bean milk feels gliding down your thirsty throat on a hot day. Ahhh...... 

Making your own soya bean milk is fairly easy, albeit tideous. I can attest to this because I made some the other day :)

I got about 3 litres of milk out of 200gm of soya beans (and 3 litres of water of course). Here's how you do it;

1. Soak soya beans in a bowl of water overnight.

the before

and after, look how the beans expand overnight

2. Throw away water and rinse beans under running water.
3. Place half the amount of soya beans in the blender with 1 litre of water. Blend till smooth.
4. Strain mixture using a muslin sieve. Squeezy squeezy :) Do not throw away the pulp just yet.
5. Repeat blending & sieving process with the remaining half of the soya beans and another litre of water.
6. With the last litre of water, blend pulp, strain and discard.
7. Sieve milk for one final time to remove any sediments.
8. Boil milk in a large pot, keep stirring to prevent the bottom from being burnt. (yes, it sneaks up on you, so keep stirring!) Add in pandan leaves. 

scoop out the foam that forms

9. Bring milk to boil till foaming for 3 times.

* I added sugar as I go along. So am not really sure how much I used.

have it hot or cold, delicious!

Wednesday, September 10, 2008

Pong Teh & Sambal Belacan

TW & I have have been deprived of fresh vegetables & fruits for 2 weeks! We have not been going to the pasar malam (night market) lately, mostly because of the weather and also our lack of timing. There was nothing much to salvage from the refridgerator, except for some chicken. Luckily, pong teh came to mind.

Pong teh is a Peranakan dish made of typically; preserved soy bean paste (tauchiu), garlic, shallots, potatoes and chicken/pork. It's a staple dish in a Peranakan's household, from important occasions such as Chinese New Year & Cheng Beng (All Souls Day), to everyday dinner.

Pong teh is actually very easy to make. Trust me. If a first timer like me can pull it off, so can you :) And best of all, it requires very basic ingredients, which I'm sure you can find off the shelves of your kitchen.

I'm sharing with you here, my mom's recipe.
Ingredients (makes more than enough for 2 hungry people)
  • 5 cloves of garlic, pounded (preferably with a pestle or if you don't have one, use a blender)
  • 5 shallot bulbs, pounded
  • 1 tbsp tauchiu paste
  • 2 medium sized potatoes, skinned and cut into bite sized pieces
  • chicken (I used a wing & some breast meat. In my opinion, dark meat compliments this dish well. If you plan to use pork, sam chan yok (pork with fat & rind) is a good choice)
  • 2 tbsp cooking oil
  • 1/2 tsp dark soy sauce
  • 1 1/2 cup of water
  • a dash of sugar (Back in the days, sugar canes left over from offerings during the Chinese New Year were used)
  • salt (optional, in fact I didn't use salt at all because the tauchiu paste that I used is already salted)

Cooking process
1. Heat 2 tbsp of oil in a wok. 
2. Fry pounded shallots, followed by garlic till fragrant.
3. Add in tauchiu and fry for a few minutes.
4. When mixture starts to 'dry' up, add in potatoes and meat.
5. Cook for a while more before adding water & seasoning.
6. Simmer till potatoes and meat becomes tender and gravy thickens.
7. You're all set!


For me, eating pong teh without sambal belacan (pounded fresh chilly with shrimp paste) is like having my McValue meal without the fries, it's incomplete. And it's just not right! Haha...

Here's what you'll need; 
2 fresh red chillies
some belacan


To whip up this yummy concoction, toast the belacan and pound it with the red chillies. Add some salt if the belacan is not salty enough. Serve with a generous squeeze of calamansi. Easy peasy rite?


Friday, September 5, 2008

The 3Ms - Merdeka, Minnie, Mooncakes!

First of all, allow me to briefly explain how the 3Ms relate to one another. It was the Merdeka (Independence Day) weekend, which coincides with my niece's birthday (the little rascal turns 2 and I got her a Minnie Mouse soft toy) and also the beginning of the Mid Autumn Festival. It's a fantastic opportunity to be spending time with my loved ones. (Not to mention a full day marathon of the oh-so-drama!, Hong Kong serial Moonlight Resonance). Hey, that's another M to the list!

Back to the 3rd M, it's imperative to have mooncakes for Mid Autumn Festival. So this year, instead of buying a box of mooncakes for my bf's parents, I decided to make them myself. 

Since it's my first attempt, it'll be unwise to be over ambitious. So I decided to make the jelly type, which I think is less challenging compared to the baked and ping pei (snowskin) variety. I made 2 types of flavour, white coffee & peanut butter. 

I got all of the ingredients from a hypermarket so it's really convenient. Here's what you'll need;

Outer Layer (this quantity is enough for 1 type of flavour only)
1/2 tbsp jelly (agar-agar) powder
1/2 tbsp instant jelly powder* 
70g caster sugar
1/2 tbsp corn flour (mix 2 tbsp evaporated milk)
115ml low fat coconut milk (dilute with 285ml water)

*(you can get this from baking supply shops or like me, from a hypermarket. Look for Jim Willie brand but don't get confused because this brand produces konnyaku jelly powder as well. The packaging looks exactly the same so make sure you get the one that says 'agar-agar powder'. If you compare the ingredients printed at the back of the packaging, the konnyaku pack has solely konnyaku powder while the agar-agar powder has a mixture of konnyaku and agar-agar powder)

Jim Willie instant jelly powder and the mould that I used

Fillings (White Coffee Flavour)
1 sachet instant white coffee mix
250ml water
1/2 tbsp jelly powder
1 tbsp corn flour (mix with 1 tbsp water)

Fillings (Peanut Butter Flavour)
2 tbsp creamy peanut butter
85ml low fat coconut milk dilute with 115ml water
60g sugar
1/2 tbsp jelly powder
1/2 tbsp corn flour (mix with 1/2 tbsp water)

Method
Prepare fillings first.
1. Stir in coffee mix and jelly powder with water in a pot and let it simmer. (you can add in some sugar if you like it sweeter)
2. Add in corn flour mixture. Stir well.
3. Pour mixture into small moulds (chwee kueh moulds will normally do the trick. Since i have none, I used a mini cupcake pan)
4. Leave till set and remove from moulds when it's ready.

Cook the outer layer second.
1. Mix sugar, jelly powder & instant jelly powder and cook with coconut milk till dissolved. (For peanut butter flavour, add in a few drops of brown colouring).
2. Once the mixture comes to a simmer, stir in the corn flour mixture. 

Finally, assemble.
1. Pour some outer layer mixture into mooncake moulds, a few tablespoonfuls will do. 
2. Leave till half set, then put in the fillings.
3. Pour in the outer layer mixture to the brim. 
4. Leave to cool and chill in the fridge for a good couple of hours.


dark brown - white coffee filling, light brown - peanut butter filling
(pardon the mess in the background)

the inside

here's the 1st batch, white coffee flavour

white coffee & peanut butter flavours

this is the box i got from Bake With Yen, very nice no?