Wednesday, November 26, 2008

Chewy (or not) Rum Raisins Chop Chip Cookies

Hello there! It's me again....the proud owner of a brand new oven! :) Finally, TW and I won't have to make garlic fried rice everytime we have some left over. Now we could make cheese baked rice and perhaps some twice baked potatoes as starters then creme brulee for dessert. Oooo my tummy's rumbling :)

The oven is huge for a bench top type (I had a bit of a problem looking for a place to fit it in my small and already packed kitchen) and it comes with 5 functions; stew, fan oven, bake, rotisserie and grill. My my, the stuff that I could churn ouBoldt of this baby...let's just hope that my old friend, procrastination, won't get the better of me.

Now I was feeling rather 'up to it' yesterday. Why not bake some cookies? I still had some raisins in the fridge and plenty of brown sugar and rum from my previous ice cream recipe. All I need was flour, butter and eggs. 

Here's the full recipe;
  • 1 cup dark raisins, soaked overnight with 1/4 cup of rum (I used Captain Morgan)
  • 1 cup (about 1 block) of unsalted butter, softened
  • 3/4 cup castor sugar
  • 1 cup brown sugar, packed
  • 2 1/2 cups all purpose flour, no sifting required
  • 2 large eggs, room temperature
  • 1 tbsp vanilla extract
  • 1/2 tsp fine salt
  • 1 tsp baking soda
  • 2 cups semi sweet choc chips (I used Hershey's)
Follow the steps below and you're well on your way to gorgeousness :)

  1. Preheat oven to 175C. 
  2. Line baking tray with parchment paper.
  3. Cream sugar (brown & castor) and butter till fluffy and light in colour. (I used a hand mixer)
  4. Add eggs, one at a time followed by vanilla extract and beat till well mixed.
  5. Add flour, salt and baking soda and beat till just moistened.
  6. Fold in choc chips and raisins (tip in the rest of the rum too) and let mixture rest for about 10 minutes.
  7. Place tablespoonfuls of mixture onto the prepared baking tray, spacing about 2 inches apart. (or else you'll end up with one HUGE cookie)
  8. Bake for about 10 minutes or until the edges are brown but centre is still soft.
  9. Remove from oven and leave them on the baking tray for about 5 minutes before transferring to wire rack to cool completely.
These cookies turned out chewy. If you want them to be crispy, just pop them back into the oven for a few minutes. Either ways, they're absolutely addicitive. 

I found a great article that explains and teaches you on how, with a little bit of tweaking, you can achieve crispy or soft chewy cookies. Read it here.


these are dangerously close


i think i'll use shortening instead of butter next time,
maybe they'll turn out harder and spread less


store them in an airtight container for up to 2 weeks....
but I doubt they'll be around that long!

Friday, November 21, 2008

Egg Tarts (of the Portuguese kind) Revisited

I LOVE egg tarts. I had the opportunity to visit Macau earlier this year and considered my trip there complete only after I had a taste of their infamous egg tarts. Such was my LOVE for this delightful pastry.

I've tried egg tarts from many different cafes and bakeries and came to a conclusion that there are basically 2 types of crusts; shortcrust pastry that crumbles with each delectable bite or puff pastry which is light and flaky. I LOVE them both. Anything goes for me as long as they're egg tarts. 

I am not too happy with the results of the egg tarts I made the last time. So I decided to give it another try but I have a confession to make. I took a shortcut. Didn't make the pastry from scratch this time. Instead, I got frozen puff pastry from Cold Storage. Ok ok, so I was a teensy bit lazy and took the easy way out. Maybe you should too ;)

Right, here's what you'll need;

  • 1 packet frozen puff pastry (I didn't use all of them though)
  • 4 egg yolks
  • 1/3 cup castor sugar
  • 1/3 cup whipping cream
  • 1/3 cup milk (I used low fat)
  • 1/2 tsp of vanilla extract
And here's what you do;
  1. Thaw puff pastry according to instructions on packaging.
  2. Preheat oven to 200C. 
  3. Beat yolks, sugar, whipping cream, milk and vanilla extract for a few minutes. Strain the mixture if you must. I was in lazy mode so I didn't.
  4. Grease muffin moulds or ramekins with melted butter.
  5. Dust working surface with some flour and roll out pastry to desired thickness. 
  6. Cut rolled pastry using an upside down glass or bowl (whatever that's handy) and line into moulds by pressing gently on bottom and side.
  7. Pour egg mixture into lined moulds about 80% (90% for me as I was feeling rather mischevious).
  8. Bake for about 15-20 minutes or until crust turns golden brown and the filling has set. Oh yes, those brown spots on the filling would be lovely.

i made the first 2 using ramekins. And I took them out of the oven before the filling could caramelised with lovely brown spots.

But the custard filling looked great though. 
And it tasted good too, neither too sweet nor milky.

The rest were mini ones as I didn't have my regular muffin pan with me. 
This time I left them in the oven for a little longer. It was kind of exhilirating to watch the filling bulged and ballooned to the verge of bursting but it never did. Don't know if they would but I figured that it would be a rather messy affair if it did.
They're sort of cute aren't they :)


Monday, November 17, 2008

A Simple Meal for Two

Well, the title says it all. Really, there's nothing fanciful about our dinner today (when has it ever? lol!). But it's still yummy and nutritious, goes well with rice and most importantly, darn easy to put together. So here are my recipes for Steamed Fish With Ginger Paste and Stir Fried Kangkung (Water Spinach). 

Steamed Fish With Ginger Paste
  • 2 fish fillets (honestly I don't know what type of fish I used. Take a look at the picture and let me know will you :) But I think dory fillet would be great for this recipe)
  • salt & pepper
  • 3-4 inches young ginger, skinned and sliced
  • 3 tbsp olive oil
  • 1 tbsp sesame oil
  • 2 tbsp oyster sauce
  • 1 tbsp soy sauce
  • a stalk of spring onions and a sprig of coriander, chopped (for garnishing)
  1. Boil water in a wok or rice cooker (mine comes with a plastic perforated steamer tray that fits into the top).
  2. Rub some salt and pepper on both sides of the fish. Put fish on a metal or heatproof dish.
  3. Blend ginger and olive oil to a smooth paste. Pour paste over fish.
  4. Steam fish over rapidly boiling water for about 20-30 minutes.
  5. Combine sesame oil, oyster sauce and soy sauce and pour over cooked fish. 
  6. Garnish with spring onions and coriander.

My photography 'skills' (if you can even call it that) is extremely basic so it doesn't look quite appetising here but it's really nice....really! 
 Gives you that warm feeling after eating (probably not because it was so lovingly prepared but the ginger)

Stir Fried Kangkung
  • 300g kangkung, soak in water, washed and drained (I do this at least 3 times as I find that kangkung may have lots of foreign stuff lodged between the stalks...don't wanna risk biting into a snail or something...acckk!) Roughly chop your squeaky clean kangkung, about 1-2 inch in length.
  • 4-5 cloves of garlic, smashed and discard skin
  • 4-5 cili padi (bird's eye chilly), sliced diagonally
  • 1 tsp concentrated liquid chicken stock
  • 1-2 tbsp oil
  1. Heat oil in wok and fry crushed garlic till fragrant, but not crisp.
  2. Add in cili padi and give it a quick stir.
  3. On high heat, toss in kangkung and stir fry till the leaves start to wilt.
  4. Add chicken stock and stir for another 30 seconds or so.
  5. Dish up and you're all set.

A different take from the usual kangkung belacan (water spinach with prawn paste). 
Those bird's eye chillies sure were hot, as good as chilly paste I tell ya.
TW loved it!
Maybe next time we'll have this with plain rice porridge :)

Friday, November 14, 2008

More Fun With Fondant

Hello my lovelies! This past week has been a flurry of activities, not to mention some really fantastic news. I attended a fondant cupcakes class, went shoe shopping (yes, this particular activity is rather strenuous :)) and one of my former schoolmates May, who's getting hitched in December is asking me to bake her bridal gift cakes! My heart skips a beats, lol! My goodness. I am excited, happy, nervous, concerned, anxious and delirious all at once.

It was good timing too that I signed up for a fondant cupcake class. Before this, the only experience I had with fondant was making some simple flowers. I was so looking forward to see what I could learn from the class. And hopefully use it wisely to create some nice looking toppers for May's cupcakes.

And so there I was on a Saturday morning, sitting in the cosy kitchen of Cake Connection, bubbling with excitement. Yasmin Sanusi, our instructor, introduced us to gum paste and fondant, letting us feel (literally) the difference between the two. They both look exactly alike but gum paste feels tougher while fondant much more pliable. Gum paste is preferred over fondant in flower making because the dough is very elastic, making it possible to be rolled out thinner. But gum paste hardens rather quickly, so it's best to work with nimble fingers. Fondant on the other hand, remains softer much longer and is suitable for covering cakes. It will harden over time but never bone hard.

Yasmin taught us 6 designs; a snowman, a teddy bear, sea shells, butterflies, a tea set and a scarf for fabric effect. We used pure fondant to cover the cupcakes and a dough mixture of 50% fondant & 50% gum paste to make most of the figurines, except for the butterlies where pure gum paste is needed in order for the wings hold its shape. 

To assemble parts of the figurines together, piping gel was used as glue. For bigger objects like the butterfly, we used fondant glue, which is a small amount of fondant mixed with water to form a paste.

Now let's leave it to the pictures to do to the talking :)
*The term dough here refers to a mixture of 50% gum paste, 50% fondant


Meet Poppet my snowgal.
This was the 1st figurine that we made and I'm very happy how it turned out.
Tips: 1. use a strip of spaghetti to attach the head to the body.
2. using a small sifter, dust icing sugar to create snow.


And this is Robert the teddy bear.
Robert seems to have a bit of a problem with his left arm and he's got cracks all over his body.
Tips: 1. mix brown, yellow and orange gel colour to achieve the 'teddy bear shade'.
2. to achieve equal sizes for the limbs, roll dough into a ball and cut it into half. Obviously I didn't, hence the oversized left arm.
3. warm dough between palm of hands and knead it to reduce cracks, if there's any. Apply shortening on hands, just a little.


Forget me nots and butterly, a design suitable for weddings.
The flowers were provided by Cake Connection while the butterfly was made using a cookie cutter. The designs on the base were achieved using crimpers.
Tips: 1) dry butterfly cut out downside up on an egg carton (layered with tissue paper for hygiene purposes).
2) use piping tips to create designs on the butterfly wings. Press gently while gum paste is still soft.
3) paint butterfly using pearl/shimmer dust mixed with fresh lemon juice. 

 
Another wedding design, with a scarf draped across and ready made sugar paste rosebud and leaf. I love the fabric effect, don't you? :)
Tips: 1) roll out dough thinnest possible to have a more realistic effect.
2) use a toothpick to gently roll along the edges of the scarf to create waves.


Seashells (a clam and a true tulip) on an ocean bed.
Tips: 1. to get streaks in your dough, tint with a darker shade of gel colour. Press fondant together and then pull and stretch to form marbling.


Ahh...the tea set. This was rather meticulous as they were very small.
Tips: 1) to make cups, roll dough into tiny balls and use a stick to gently poke a hole in the middle, wiggle it a little to create depth.
2) use a tiny paint brush to apply pearl/shimmer powder mixed with fresh lemon juice onto the cup rim and handle.


The whole line up. Look how tiny my Poppet was compared to her snowy friends :)


Monday, November 10, 2008

Fondant Fun ~ The First Time Around

Hello my friends! This entry is supposed to be of vanilla cupcakes & buttercream recipes. But before I do that, let me share the following with you.

I have always admired other blogger's creations, especially tiny fondant figurines that I thought were impossible to construct (well, for me at least). I especially love, love, love the handyworks of Bakerella & Su Yin. These ladies are absolute geniuses at what they do and it seems that they NEVER run out of ideas. I seriously think that they should come up with a book. I'll be first in line to buy!

Now....as for yours truly, my first experience with fondant was for my brother's wedding cupcakes. I thought it would be nice to have some flowers as toppers so I bought a pack of fondant, a set of basic flower making tools, a few bottles of colour gels and started to experiment on my own. The first thing I did was to pinch a small portion of the fondant and tasted it. I heard that they don't taste too good. But hey, it wasn't bad at all. But then again nothing beats buttercream. Well what can I say, other than the heavenly taste of whipped butter and icing sugar, I don't mind getting my hands dirty while eating a cake. Fondant is just too......tidy, don't you think so?

Here are some pics I managed to take;


the essentials: a flat working surface (i used the back of a glass chopping board),  icing/powdered sugar (to dust the work area & hands), toothpick (use them to apply colours), fondant (but of course), a rolling pin, flower making tools, cutters, gel colours, shrink wrap (to wrap unused fondant which will dry out quickly otherwise), water (to stick fondant together)


dust, roll and cut out


as you can see, the thickness of the first cut outs were inconsistent. I rested them on a piece of foam dusted with icing sugar. Started off with pink and purple colours. Then I brought the flower making tools into play; I pried and I pressed and I poked till I was happy with the shapes. 


And as the day progressed, I became a little bit more adventurous and experimented with more colours and layering. Then I topped some pretty metallic dragees on them.  Heck, I even threw in a ducky while I was at it :) Cute little fellow eh?


spot the ducky!

* It's been 2 weeks since the wedding and the extra flowers that I kept are still good. It didn't turn rock hard, the colours didn't fade and the taste is fine.

Thursday, November 6, 2008

What Do You Do With 320 Cupcakes

Why, you give them away of course! Hello there, I'm back! And how have you been? :)

The past 2 weeks have been hectic but loads of fun. Had my hands full with cupcakes, cupcakes and more CUPCAKES. Goodness, I even dreamt about them in my sleep. And when I woke up, the smell of vanilla and buttercream still lingered on my hands. All for my brother's wedding which was, awesome! I hereby would like acknowledge the 2 fantastic sous chefs i.e. mom & sis who came to my aid. You guys are champions!

The first batch of 120 cupcakes were delivered to the lovely bride in Singapore, as part of the bridal gifts (along side some other auspicious items) from the groom. The 20 boxes of cupcakes survived the journey, although I freaked out a little when I found out that the boxes were growing warm, tucked away for 4 hours in the car boot. But thank goodness for the fantastic buttercream recipe; none of the cuppies suffered the effects of gobal warming. Phew!

The fondant flowers were made 3 days in advance while the baking was accomplished the next day (2 types of cake, the basic chocolate and vanilla). Finally all decorating works were done the following day; there were a total of 6 designs. Everything was kept simple as I didn't want to be too ambitious the 1st time around. 

from the back: chocolate cake with cocoa buttercream, chocolate cake with vanilla buttercream and the rest are vanilla cake with vanilla buttercream.

these are all vanilla cake with vanilla buttercream

Wanna take a closer look? Here we go :)

lovely metallic dragees

nothing says it like to 2 hearts united on a cupcake!

swirly swirly
I kinda like the orange one in the background, it reminds me of sea corals. No Nemo though :)

6 in a box

And they were packed in these (brace yourself Wee, lol!)

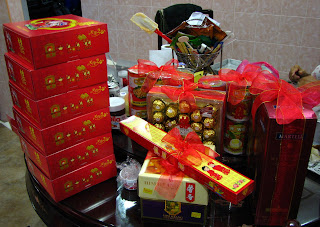
Mom flat out disapproved of white boxes (she didn't think it was auspicious) & i couldn't find silver ones that could fit 6 regular sized cuppies. I drove from Puchong to Section 14 to Kota Damansara to Kepong, alas, the search was futile. These are SCREAMING auspicious, don't you think?


the rest of the bridal gifts
spot the not! :)

Well, that's the first 120. I'll write about the rest of the 200 in another entry. Till then, take care!
And oh yes, I'll post the recipes too ;)