Saturday, January 31, 2009

Chinese New Year 2009

Kong Hey Fatt Choy! Time flies, it's already the 6th day of Chinese New Year (not to mention the last day of the first month of the year!), I hope you had a fantastic one! This year, my family & I gathered at my sister's place up north; 8 grown ups and 1 super energetic toddler all cramped up in her cozy little apartment. And truth to be told, this is by far the best Chinese New Year that I have ever had. All we did was eat, snack on peanuts and sunflower seeds, drank Kickapoo and shandy, played poker and took turns entertaining the little princess. My goodness, she sure has LOTS of energy than all of us combined....on second thoughts, I think we are the ones who are getting old. I used to be the baby of the family and I'm hitting 30....go figure how old the rest are....lol!

It's been a very refreshing CNY this time around; no temple hopping (back home, my parents & I would go to about half a dozen temples in and around the city on the 1st day of CNY), no visitors (we've got no guests to entertain here at my sister's place) and no home made traditional cookies (pineapple tarts are my mom's specialty). 

However there are traditions can't be missed. We had an energetic, tummy stretching reunion dinner (steamboat this year) and mellowed down to a more relaxed session in front of the telly while waiting for the clock to strike midnight. And oh boy, when the clock struck twelve, the firecrackers madness began! My fellow Chinese here sure are festive! On and on distant bangs were heard followed by occasional mini explosions that made us jump in our seats. We also managed to catch a short display of fireworks beyond the many high rise buildings. No pictures taken though; too engrossed to grab our cameras.

I also managed to whip up some cupcakes upon request by my sister. She started buying cakes for CNY two years back, check out the pics.


the one on the left is from year 2007 and the right 2008
Truth to be told, I just can't stand having non-edible stuff on cakes. 
Look at the plastic cherry blossoms! tsk tsk....*shakes head disapprovingly*

It's my mission this year to keep up with this new tradition of hers. I couldn't bring along too many of my decorating tools with me as I'll be taking the bus back to KL. So I managed to come up with 6 very simple designs; a goldfish, a moo cow, firecrackers, mandarin oranges, pomelos and cherry blossoms. (I still think they're not festive enough....perhaps better designs next year)


the auspicious 6

green juice pomelos


happy (punk?) goldfish


succulent mandarin oranges

fiery firecrackers

This Chinese New Year was certainly different but in no way less enjoyable. After all, it's the company that counts :)

Tuesday, January 20, 2009

Miniature Cakes

I went for this very interesting miniature cakes class about a month ago (yeap...this post is long overdue) at Cake Connection. I was a little unsure and very, very excited. I didn't know if I could pull it off. Because they're so small, and I have large, sometimes clumsy hands. Really.

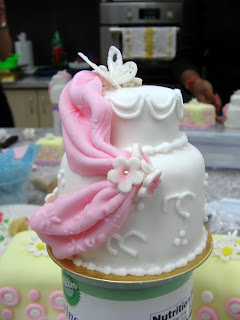
But our friendly instructor, Lynette made it so much easier with her clear instructions and demonstrations. As usual, print out of recipes were provided, as well as materials like cake, fondant, sugar paste flowers and decorating tools. We were taught 2 types of miniatures, a single tier square cake and a 2 tier round cake. And then the time came when we had to spread our wings and fly.......Lynette went round asking which miniature we'd like to start off with; almost all of us picked the square cake. Lol....but it was inevitable. Like Lynette said, sooner or later we had to finish both of them.

The cake provided was madeira and let me tell ya, it was really really good. That's because Lynette used pure vanilla extract and it made a world of difference. No sickly sweet artificial smell, just pure floral vanilla. The buttercream was equally good, light and fluffy. We were in good hands :)

It took us about 2 hours to assemble miniature cakes of our own. Everyone was beaming with pride by the end of the class. It was so satisfying to see something so delicate made possible with our bare hands. We all swore not to eat the cakes...haha, well how could you? Take a look at the pics and you'll see why.

this is the first cake, looks pretty simple eh? it's about the size of my palm
and can u see the half way done 2 tier cake in the background?


pardon my very un-manicured thumb, just wanted to show you the size of the cake in relative to my hand


2 tier mini cake, looks like a wedding cake eh?


these are done by the master herself, Lynette
the stripey green cake on the left was a demo only, not included in our class
very tedious work as the green lines were piped alternately with royal icing


cross section of the cake....
just in case 'some' people don't believe that it's edible, rite Darryl? :p

I would say that I'd love to make miniatures again but probably not for sale. They are very tedious and time consuming. But having said that,  they are such a joy! It's like producing a work of art. This is definitely one of the best classes that I signed up for. 

Friday, January 9, 2009

Easy Peasy Steamed Egg Recipe

This dish is a request from my old school mate, Ben who sms-ed me the other day and said that she's been craving for steamed eggs and were looking for a simple recipe. Well look no further Ben, this recipe is as simple as Simon!

Incidentally, this is my first time making this dish too. And it turned out gorgeously! No unsightly bumps and the texture was as smooth as tofu. The secrets; medium fire, a sieve and a plate ;)

Ingredients (Serves 2)
  • 1 egg, 1 salted egg (you can add century egg too if you like)
  • water
  • a few drops of liquid chicken stock
  • garnish: chopped spring onions, pepper and sesame oil
Steps
  1. Heat enough water for steaming in a wok.
  2. Break eggs into a bowl, set aside the salted egg yolk.
  3. Cut salted egg yolk into small pieces.
  4. Add a few drops of liquid chicken stock to eggs and beat using a pair of chopsticks or fork. Do not get too excited, gently does it :) We don't want too much of those pesky bubbles on the surface.
  5. Add equal amount of water to egg mixture (if your egg mixture measures half a bowl, then add half a bowl of water too), stir well. 
  6. Sieve into a shallow metal dish then add the egg yolk pieces. 
  7. Remember step 1? The water should come to a boil by now. Reduce heat to medium. Put the metal dish (covered completely with a plate - important if you want that smooth surface) on the steaming rack, put on the lid for the wok and steam for 15-20 minutes.
  8. When it's done; add a dash of pepper, a few drops of sesame oil and some chopped spring onions.
Unfortunately I didn't take any pictures. Was feeling a bit under the weather yesterday. But anyway since this recipe is a huge success, I'll be making it again in the near future (especially when supplies are running low in the kitchen....). I'll be sure to take some pics then.

Happy trying!

Sunday, January 4, 2009

A Black & Pink Affair

Happy New Year to you! Got your new year resolutions all sorted? Moi, haven't found time to really list them down, just a few mental notes here and there which would inevitable lead to forgetting them over time. On a plus note though, I've gotten myself a nice organizer from Starbucks. Let's just hope I'll use it regularly! God knows how many fancy looking notebooks and journals I got, all lying forgotten after a few months. Sigh...are you like me? Please do not be me! :)

Moving on from resolutions to celebrations; how did yours go? Nothing much for me, just hung out and had a late night snack plus drinks with a couple of friends. They just got back from May's wedding, whom is a mutual friend of ours. I got my working schedule all mixed up so I couldn't attend. I totally overlooked the fact until a couple of days before. There I was, day dreaming how I should wear my hair for the dinner and the light bulb went *ding!*

But anyhow, I still had the opportunity to be a teeny tiny part of May's happy occasion. She gave me the opportunity to make her bridal cakes, all 78 boxes of it. I did quite a lot of research on designs and colour scheme when it suddenly hit me; why.....black & pink of course, that's the theme for her wedding dinner! Duh....

So off I went on a mini shopping spree; boxes, craft papers, fondant, gumpaste, flour, eggs, butter, pink gel colouring....all checked! Except for black gel colouring. They were nowhere to be found, not even a single tub. Seriously......I really gotta thank my lucky stars when Nancy & Shyamala from Cake Connection lent me theirs. HUGE sigh of relief!

I started on the boxes a few weeks in advance, as there were a lot of work cutting the craft paper into strips to form ribbons. The holders inside the box were also cut manually. Yes, you might think that I was crazy. I almost went ballistic! I had my bf; JL to thank. He helped out a lot on that part. 

After I finished with the boxes, I moved on to the cake toppings. A little wiser this time around, I used 50/50 to make my toppers. I cut out butterflies, heart shapes and lots of tiny flowers of different sizes. And truth to be told, I wasn't too sure how the final layout would be. My vision of the final product keeps changing. So, I decided to let my inner voice guide me when the time comes. Lol....

I learned loads throughout this project. It's tough, especially when I am reminded all the time that I am on my own. No mom or sis to come to my rescue like when it was my brother's wedding. The radio was my constant companion, the toothpick my best friend and the rain my number one enemy. Well, you get the idea with the radio but toohpicks I hear you ask? Yea, nifty little stuff they are. I use them to dip into different tubs of colourings, add details to the toppers and a myriad of other uses that solves most of my headaches. As for the rain........I had my butterflies all nicely dried like they were in flight but the humidity wreaked havoc on them! In no time, my poor butterflies wings fell flat on the tray. Plop.......ok, so that called for plan B. (Check out the photos below and I'll explain more).

Right, I think it's time for some pictures;


the original plan was for the butterfly to take the place of the heart, 
but since the wings went plop, i had to switch to plan B


specially for May & Kevin, congratulations guys!

Finally, a huge thank you to;
  • May - for trusting me with this important task
  • JL - you kept me sane & calm during those hair raising moments
  • Ryan - for getting cardboards for the holders and exploring ideas with me
  • Nancy & Shyamala - you guys whipped out that precious little tub of black gel at just the right moment. I was at my wit's end :)
p/s: oh yes, I have decided to name my small cupcake enterprise BunsInTheOven, thanks to Wee for the brilliant idea!